Monday, 22 September 2014

PAYESH (RICE KHEER / PUDDING)


PAYESH /RICE KHEER is considered very auspicious among us. It is prepared on special occasions, be it birthday, baby shower, puja or any other auspicious ceremony. Actually you can have it any day, whenever you wish to. You can cook it in two hours. Our elders say, on birthdays, one must have a bowl of Payesh, it ensures a longer life. A wife or a mother prepares it wishing that.
Originally or authentically Bengalis make payesh with rice. Gradually with time and developing the power of acceptance, we prepare it with other ingredients also, like vermicelli , sago , broken wheat, carrot, and even bottle gourd. Hopefully, I can come up with each one of them in future.
With the festive season around, let me share this recipe of Rice Kheer, so that they become sweeter by the magic of your hands.
During winter, with the availability of date jaggery, we use date jaggery instead of sugar. I can guarantee you will be in the seventh heaven so far taste is concerned.

INGREDIENTS :
Fragrant Rice ( Gobindo Bhog / Chini Gura / Basmati ) : 3 tablespoon
Full Cream Milk : 1 litre
Sugar (alternatively date jaggery) : 1/2 teacup + 2 tablespoon.( in case of date jaggery it should be half cup. I would suggest measurement should be as per your taste)
Green Cardamon : 2 ( not required if you are using date jaggery)
Bay leaf : 1
Cashew : 8 halved
Raisins : 8.
Ghee : 1/4 spoon.

PROCEDURE :
Place the rice in a bowl, wash thoroughly,drain the water. Pour in the ghee onto the rice bowl and mix well. This helps the rice not to stick with each other. Wash the raisins and soak in warm water. Cashews to be halved.

Pour the milk in a heavy bottomed pan. Switch on the gas. Put the gas mark at low. This dish is to test your patience. Once the milk comes to a boil, clean and put the bay leaf. This enhances the flavour. Now you have to stir the milk constantly. Otherwise it may burn from down.

Keep stirring the milk till it gets a bit creamier. At this stage, put in the rice. Give a stir every 3 minutes until the rice is boiled.

Please donot over boil the rice. You have to take care of that. Once the rice is almost boiled, put in the sugar. Keep on stirring.

Crush the green cardamoms. Put into the kheer once it gets creamier. Add the raisins and cashews. After 2 minutes, switch off the gas. It's done. Pour onto a serving bowl.

Please note , always add the rice first to the milk. Put the sugar only when the rice is done. In case you are using date jaggery , crush it and mix towards the end. Once it melts, immediately switch off the gas. Otherwise  the milk will curdle.


Saturday, 20 September 2014

BHAPA DOI (BAKED YOGURT)


Just one week left, and the festive season is on. The biggest festival of the BENGALIS  , which comes once in a year, is at our doorstep. In whichever part of the world we are, we will celebrate. Maa Durga comes down to earth with  her four children leaving her husband Lord Shiva back in heaven to shower her blessings on us. Earth is said to be her parental house.

Mythology says Durga Puja was at first  celebrated during spring. It was King Rama, said to be the 7th incarnation of Lord Vishnu, who celebrated for the first time in autumn before going to kill the demon Ravana. Story goes long which this blog space & the blog owner's knowledge level may not permit.

All these five days, we indulge ourselves to the extreme, whichever part of the world we are in. We prepare a lot of home made sweets and greet people with warmth. I thought of sharing few recipes of homemade sweets. Let's start with BHAPA DOI ( Baked Yogurt ) today. You need very less ingredients for this. Method is too easy. If you have a sweet tooth, you will love it.


INGREDIENTS :

Plain Yogurt : 1 Coffee Mug.
Evaporated Milk : 1/4 Coffee Mug
Condensed Milk : 1/2 Coffee Mug(you can adjust as per your taste)
Ground Almond : 1 tsp
Chopped Pistachios : 2 tsp
Cardamom Powder  : 1/4 tsp


PROCEDURE :

Blend the plain yogurt, evaporated milk and condensed milk together. Add in the ground almond, mix well. Pour onto an ovenproof bowl. Pour water in another ovenproof bowl .

Place the bowl with yogurt mix on top of the bowl filled with water. It should be half immersed in water, not more than that.

Preheat the oven. Bake for 30 minutes at 180 degree centigrade in convection mode. Take out and cool at room temperature.

Garnish with chopped Pistachios. Refrigerate for 4 hours. Serve chilled.

Every oven has different features. I would suggest you to check from time to time.


Friday, 19 September 2014

KHICHURI..... BEGUN BHAJA O ALOO BHAJA


Kichuri / Khichdi / Rice and Lentil Hotchpotch is the ultimate comfort food for us. There are different ways of preparing it! At times it is made without any veggies and served alongside some fries and a mixed vegetable dish. It is  made with a variety of vegetables too. Either way it is extremely healthy. Avoiding the chilli part, we prepare it as a main meal for smaller kids too. One gets the necessary nutrition  from one single dish, cooked  quickly and is hassle free.

We prepare it with a fragrant variety of rice called Gobinda Bhog, which is not easily available outside of West Bengal. But you have Bangladeshi stores in almost all of the countries. There you get 'Chinigura or Kalijeera chal' which is nearly the same variety. Alternatively, you can use Basmati rice. The lentil Bengalis use for this recipe is Skinless Yellow Moong in general.  At times, we prepare it with masoor dal  / red lentils too. In that case we use onions.

Since our childhood whenever it rained in the evening, we knew the dinner menu will be khichuri / rice & lentil hotchpotch today with eggplant and potato fries accompanied by tomato chutney. Super lucky we were if there had some Illish (Hilsa) fish in mummy's store, then we would get heavenly tasted deep fried illish / Hilsa fish pieces. Our mother's pantry was a pandora box actually. Now you all tell me which food loving kid would concentrate on studies when it's raining outside and lovely smell from the kitchen makes you hungry all of a sudden. It's better to pen down a poem and wait for the magical words.....' Your dinner is ready'.

Yesterday, I wished to bring into life those childhood memories, tell our son about our life that was simple and we were happy with simple things in life and life necessarily need not revolve around an iPad 24/7. I was late yesterday, had to skip cooking the tomato chutney. We can agree on a conclusion that Khichuri, Rain and Bengalis have a close knit connection or bond, whatever.


INGREDIENTS :( for Khichuri )

Rice (Gobindo Bhog or Chinigura or Basmati) : 1 coffee cup
Lentil (yellow moong dal) : 1 coffee cup
Ginger Paste : 2 tbsp
Salt : As per taste
Turmeric Powder : 1 tsp
Cumin Powder : 1 tsp
Cumin Seeds : 4 pinches.
Dry Red Chillies : 2
Green Chillies : 2
Bay leaf : 1
Mustard Oil (Any other variety will do) : 2 tablespoon.
Sugar : 2 tsp
A garnish of ghee or butter is a must for us to have it!

INGREDIENTS : ( for the Fries )

Eggplant : 1 medium
Potato : 2 big
Turmeric Powder : 1/2 tsp
Salt : As per requirement
Oil : 4-5 tbsp
Rice flour : 2 tsp for dusting 
Sugar : 1 tsp

 SERVES 4

PROCEDURE :


For the Khichuri / rice & lentil hotchpotch, take the rice and the lentils in separate bowls. Wash the rice a couple of times and soak. Heat the wok and dry roast the lentils. When cool, wash it, add enough of water and cover cook at low heat until half boiled.

Add the washed rice and more of water and let cook covered at low heat! Keep checking every few minutes, add water if required! 

When the rice & lentils are almost done, add the washed & slitted green chillies, the sugar & the salt and the turmeric powder. Give a stir, cover and cook at low heat for another 7-8 minutes! Once done switch off.

Heat the oil in a pan. Temper with a bay leaf, cumin seeds and dry red chillies. Add the ginger paste, 1/2tsp turmeric, 1tsp cumin powder and salt. Keep stirring at low heat until it's nicely fried yet not burnt. Pour on the rice and lentil mixture. Stir to mix very well. Switch on the gas, keep stirring for another 2 minutes. Switch off, it's done.


For the potato fries / Aloo Bhaja, cut the potatoes into round thick slices. the eggplants into half moon sizes as shown in the picture. Wash and marinate with the sugar, salt and turmeric as much as required. Keep aside covered.

Not put the wok on the gas burner. Heat the oil. Fry the potatoes and  keep frying until both the sides are brown. Take out once done.


For the Begun Bhaja / eggplant fries, cut the eggplants as you wish, the pieces have to be thick. Wash and marinate with the sugar, salt and turmeric as much as required. Keep aside covered for 10 minutes.

Fry the eggplants in batches after dusting with some rice flour. This helps them to stay crispy for sometime. 

I would ask you to fry the potatoes first because after frying the eggplants, the oil turns black, unlikely to be reused.


Serve the Khichuri along with the fries, accompanied by sweet tomato chutney or a little of pickle. You can pamper yourself more with an omelette or fried fish, preferably Illish. ENJOY!


Wednesday, 17 September 2014

FISH IN BLACK PEPPER SAUCE


FISH....the word gives goosebumps to me....or rather to the Bengalis. In my current city , variety of fish is available but they are all sea fish. Bengal is a state surrounded by rivers and ponds. Hence, our taste buds are more accustomed to freshwater fish. Here fresh water fish are mostly available in frozen form. With kids at home we cannot always take the liberty to eat frozen things. So in a foreign land, our choice of fish gets limited. Given our love for fish, we will find some way or the other to satisfy our taste buds. I finally felt it is wiser to adapt to the changed circumstances at least to some extent.


From the various blogs by the experts, I learnt that any smelly fish , if marinated in vinegar for at least 1 hour and then washed and cooked, does not smell anymore. With all my tried and tasted recipes on fish, I have seen if we use onion and garlic , curry made with smelly fish can taste good.
Yes, you are right, with availability  of fresh water fish in abundance , Bengalis do not use much onion and garlic in fish curries except for in few dishes.

This FISH IN BLACK PEPPER SAUCE is a favourite with my men. They love it either as an appetiser or as a non vegetarian side. I prepare such dishes mainly on Friday evenings with my refrigerator almost vacant preparing to welcome fresh stuffs next morning. This dish is prepared with minimal ingredients. You can however use all types of bell peppers. The day I prepared this, I had only red bell pepper and green chillies available in my pantry.... yet the end product was tasty.

INGREDIENTS :
Boneless Fish Fillets ( Tilapia, Sutchi or Grouper ) : 500 gm.
Minced Garlic : 1 table spoon
Minced Ginger : 1 tsp
Onion : 2 medium
Red Bell Pepper : 1 ( you can use yellow and green bell pepper along with it.)
Green Chillies : 4 - 5
Soya Sauce ( light ) : 1 table spoon
Black Pepper Sauce : 2 tsp.
Salt : very little as both the sauces have salt in it.
Vinegar : 2 table spoon
Corn flour : 3 table spoon
Oil : 4 table spoon.

PROCEDURE :
Wash the fish fillets thoroughly , cut into small squares, marinate with vinegar and keep aside for 1 hour.

Meanwhile, cut the onions , red bell peppers, into small cubes. Slit the green chillies. Get ready with the minced garlic and chillies.

In a bowl put in the corn flour . After 1 hour drain the vinegar from the fish. Wash again and pat dry. Add very little salt.

Heat oil in a wok. Coat the fish pieces very well in the corn flour. Fry them in batches. Please do not over fry them. Fry in batches, the wok should not be overcrowded.

Put the fish pieces in a tissue paper to drain the excess oil.Now pour the excess oil in the wok keeping only 1 tsp in it. Only that much is required. Once the oil is hot , put in the minced garlic and ginger,sauté till you get the fragrance. Put in the onion pieces. Sauté till translucent. Put in the bell peppers and slitted green chillies.

Increase the heat. Sauté for 3 minutes. Pour in the soya sauce. Stir for 1 minute. Now put in the fish pieces. Mix well carefully so that they do not break.

Now pour in the black pepper sauce. Stir in high heat for 1 minute . It's done. In the process sprinkle salt if only it's required.

Transfer to a bowl and serve hot as an appetiser or as a side with steamed Jasmine rice or with noodles.


Tuesday, 16 September 2014

TANGY TOMATO EGG CURRY


The very sight of eggs remind me of Devang Patel's famous ad "Monday to Sunday ...Roz khao andey hi andey " as part of NECC 's promotional advertisement on the health benefits of having eggs. Oh! How my mother  relentlessly tried to persuade me and my brother to have eggs , the two egg haters, citing example from this particular advertisement.

One cannot deny the health benefits of egg. It is among the most nutritious foods on the planet. Though eggs are high in cholesterol, but they don't adversely affect blood cholesterol. Infact eggs raise the HDL, the good cholesterol . It contains choline..... an important nutrient required by us and help to reduce risk of heart disease  among us. The list is big. Let's stop here with the note..... We should have eggs on a regular basis.

My husband being extremely fond of eggs, it is a regular at my home. For  egg curries, we Bengalis prefer duck eggs, it tastes better. Duck eggs being banned in this island, we remain faithful to  the more popular bird, hen.

Today, let's cook a tangy tomato egg curry. Bengali curries are generally red and hot but this one not so much of an authentic Bengali curry.


INGREDIENTS :

Eggs ( preferably of duck, else hen ) : 6 nos.
Tomato : 4 medium
Onion : 1 big
Garlic paste : 1 tsp
Ginger paste : 1 tsp
Kashmiri Chilli Powder : 1/2 tsp ( it is known more for enhancing the color of the curry but extremely mild )
Green Chilli : 3 nos
Salt : As per taste
Bay Leaf : 1
Cumin Seeds : 2 pinches
Turmeric Powder : 1 tsp
Bengali Garam Masala ( an 1 inch size cinnamon stick, 2 green cardamoms, 3 cloves , roasted and powdered )
Oil ( Mustard or otherwise ) : 2 tablespoon.

PROCEDURE :

Being a cleanliness freak, I prefer washing the eggs before boiling. Boil the eggs with half spoon of salt. This helps the shell to come out quickly without damaging the egg white. Once done, let it cool.

Meanwhile, cut each tomato into 4 pieces, discard the seeds, wash and put into the blender to get a smooth paste. Get a paste of onion,ginger, garlic and green chillies...... all separately .
Now discard the shell of the eggs. Wash again and make 2 slits on each one of them.
Apply some salt and turmeric on them and rub well.

Heat oil in a wok. Lightly fry the eggs. Take out. Temper the oil with bay leaf and cumin seeds. When the cumin seeds start spluttering, add in the onion paste. Fry till the raw smell goes. Now add in the garlic and ginger paste. Fry till the raw smell goes.

Pour in the tomato paste , keep stirring for 3 minutes, now put in the green chilli paste, salt and turmeric, Kashmiri mirch powder. Keep on stirring  till the oil seperates from spice mix.

Add 1 cup water. Let boil for 2-3 minutes. Slowly put in the eggs. Cover and let boil for another 3-4 minutes. Add the garam masala powder. Stir well. Add little sugar if you wish to. It's done. The gravy should be of creamy consistency.

This curry goes well with both steamed rice or roti.


Monday, 15 September 2014

PALAK PANEER


Paneer is a popular cheese used in traditional South Asian cuisines. It's use is pretty common in Nepal, India, Pakistan and Bangladesh.

It's versatility may be the reason for my love for it. There are a variety of dishes we can prepare  with it..... in curries, pakoras, kheer, sandesh, vegetarian kebabs and the list goes on.

To prepare paneer, food acid (lemon juice or vinegar or citric acid ) is added to the hot milk to separate the curd from the whey. The curd is then drained through a clean white cloth and the excess water is pressed out. The cottage cheese /  paneer is dipped in chilled water for 2-3 hours to give it a good texture and appearance. Today, I used a store bought paneer.

I and the son are hardcore paneer lovers, it is a must have almost every week. The husband does not love it but has it with roti / parathas! Many recipes are being done with it which are both healthy and tasty, This  self proclaimed cook who is lazy, uses store bought paneer for most of her dishes with it. Hi folks, instead of scolding me, please consider my time management skills.

Jokes apart, I believe, on Mondays we should go easy on our stomach and honour the variety of vegetables available or just have a vegetarian dish. What can be a better alternative for fish and meat other than Paneer for a desi?

I wished to share the Palak Paneer recipe today, a popular North Indian cuisine. I followed Masterchef Sanjeev Kapoor's Palak Panner recipe.


INGREDIENTS :

Paneer : 200 gm
Spinach ( Palak ) : 250 gm
Chopped Onion : 1/2 coffee mug
Chopped Garlic : 1 tsp
Chopped Garlic #cGarlic paste : 1 tsp
Garam Masala powder : 1/4 th tsp
Green Chillies : 2
Cumin Seeds: 2 pinches.
Oil : 2 table spoon
Butter : 1 tbsp
Salt : As per requirement
Garnish with fresh cream.... I did not!

PROCEDURE : 

Roughly chop the spinach discarding the roots. Blanch them. In your blender, put the spinach and green chillies together and get a smooth paste. Chop the onion & garlic, wash and keep aside.

Cut paneer into cubes and marinate with salt. 

Heat oil in a wok. Add the cumin seeds. When the seeds splutter, add the chopped onion and garlic, stir fry until the raw smell goes. 

Pour the spinach paste. Saute well at low heat because we need to retain the green colour of the spinach. 

Add a small cup of water, salt as required and the garam masala powder. Mix well. Add the paneer pieces. Stir very carefully for a minute. See that the paneer pieces do not break. Add the butter and stir.

Switch off the gas stove. It is done.

If you wish, you can add 1 table spoon of fresh cream to it. It enhances the taste of the dish.

Serve hot with jeera rice , naan, paratha, chapati. 


Sunday, 14 September 2014

QUICK FIX CHICKEN HARIYALI KEBAB


Weekends are days you wish to treat yourself  with something different, say some kebabs or fries, cooling down with your favourite wine and just relax. There are so many varieties of kebabs, using wide range of spices and fish, meat and vegetables. They are prepared in so many ways in different regions and countries, from the Middle East to South East Asia .

Originally and authentically , may be kebabs were done with lamb or beef. Succulent pieces of meat mixed with various spices and roasted on swekers over slow heat. Now a days, chicken, vegetable, paneer.....anything can be used.

Yesterday was Saturday, I wished to have some kebabs, but was not in the mood to dine outside. I had some yogurt and chicken stored i the refrigerator and the lazy mind said ..... can we have some quick fix chicken kebabs? I was really not in the mood to use swekers and slow cook.....So here goes my quick fix chicken hariyali kebabs that we will do together while listening to some good music.


INGREDIENTS  :
Chicken ( boneless ) : 500 gm
Plain Yogurt : 150 gm
Coriander leaves : 200 gm
Garlic Paste : 2 tsp
Green Chilli Paste : 2 nos.
Salt : As per your taste
Garam Masala Powder ( Punjabi ) : 1 tsp
Onion Paste : 2tbsp
Oil : 2 tablespoon

PROCEDURE :
Cut the boneless chicken into small pieces and wash thoroughly. Beat the yogurt to a smooth paste and pour onto the chicken.
Discard the roots of the coriander, wash and put into the blender along with the green chillies. Get a smooth paste and add to the chicken. Add the garlic paste, onion paste, oil, salt and garam masala too.  Fold in very well.


Refrigerate in a closed container for at least 2 hours.Take out 1 hour before cooking and transfer into a grill plate along with the marination.


I cooked in Microwave + Grill option for 15 minutes, taking out and turning every 5 minutes.


Once done, transfer into a serving plate. Squeeze juice of a lemon over the kebabs. Garnish with  coriander leaves and onion rings if you wish. Isn't it quick fix ?


Saturday, 13 September 2014

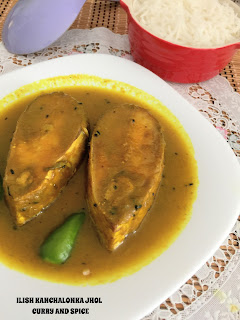
ILISH KACHALONKA JHOL / HILSA LIGHT CURRY


Tenualosa Ilisa is a species of fish in the herring family( Clupeidae). Among us, the Bengalis, it is considered the king of all fish and commonly called Ilish..... in English.....Hilsa. It is an oily fish rich in omega 3 fatty acids. They say it has beneficial effects in decreasing the cholesterol level. I will not go much deeper into its beneficial effects, as Wikipedia also goes wrong at times. We eat it because we love to, a simple revelation to the truest sense. In whichever part of the world we are in, we would venture out in the lookout for a Bengali, at least for a South Asian Market & Hilsa fish would be our first hunt! In these few years of stay here, I took the initiative right on reaching to find out Bengali shops, the sight of my known stuffs gives me happiness, so does my language! Among the Bengalis, Ilish can be cooked in a light curry base, fried, steamed, baked or smoked wrapped in young plantain leaves, prepared with mustard seed paste, curd, eggplant. It is said there are 100 ways of cooking it. No, I won't brag of knowing them all. But yes, being a true Bong I can brag if the fish is fresh, it can be cooked only with green chilli paste or just with slitted green chillies. And yet it will taste heavenly, I mean if you are used to it or if you want to take interest in our food & culture. It's roe, has a distinct taste when fried, it is simply heaven & delight on our meal plates!


INGREDIENTS :

Hilsa Fish : 4-5 pieces
Turmeric Powder : 1 tsp
Salt : As per taste
Green Chillies (moderately hot ) : 4-5.
Nigella Seed (Kalonji) : 2-3 pinch
Mustard Oil (Must for us) : 2 tablespoon


PROCEDURE :

This fish has a lot of scales. So wash the pieces very well. Add half tsp turmeric powder and salt as required. Marinate for about 10-15 minutes. Prepare a paste of the green chillies or just slit like I have done.

Heat the oil in a wok. Temper with the nigella seeds. When it gives out aroma, add the slitted green chillies or the paste. Give it a stir and add the remaining 1/2 tsp turmeric powder and salt as per your requirement. Stir for 1 minute.

Pour in 1 big cup of water . Cover, let boil for 2 minutes. Now, add the fish pieces carefully into the boiling curry. Lower the heat, simmer for another 2 minutes. Switch off the gas stove. It's done.

Remember this recipe does not require frying the fish. It is recommended to cook the fish curry this way only if it is fresh and not frozen. The fish oil that oozes out from the fresh pieces is what enhances it's taste. This curry is meant to be enjoyed only with steamed rice.


Friday, 12 September 2014

MASALA MUSHROOM


Let's go back..... may be 20 to 30 years..... Mushroom was not so known in my hometown..... or state.... or rather country. Whatever the source may be it was considered to be unhealthy and poisonous. The fish loving BONGS refused to think beyond freshest of fish, vegetables, sweets when it came to food. The scenario has changed...... a bit I would say..... Only in the cities where the supermarkets made us believe it is something worth eating..... Like my own people, the much ignorant me came to know about its nutritive value after landing in Singapore. We quite enjoy it, in soups, curries, salads. Though my visiting guests from India still have reservations about it.
This particular dish is actually the brain child of a dear colleague , I loved it when she treated us with it . Ever since I prepare it quite often.

INGREDIENTS :
Mushrooms ( button ) : 300 gm
Tomato : 1 big
Shredded Coconut : 4 table spoon.
Red Chilli Powder : 1 +1/2 tsp ( adjust according to your taste )
Cumin powder : 1/2 tsp
Coriander powder  : 1/2 tsp
Garlic pods : 4
Ginger : one inch pieces.....2
Green Chillies : 2
Green Peas : Optional
Oil : 2 tablespoon
Bay leaf : 1
Cumin ( whole ) : 2 pinches.
Turmeric powder : 1/2 tsp
Salt : As per taste.
Onion : 2 medium
PROCEDURE :
Put into the blender, the shredded coconut, garlic pods, ginger pieces and blend well with little water,
if required. Make a paste of the tomato.
Wash and cut into halves the mushrooms, put in little salt and turmeric. Mix well.
Heat oil in a wok. Temper with bay leaf and whole cumin. Put in the already sliced onions. Fry till light brown. Put in the tomato paste. Stir till oil separates.
Now pour in the mixture of shredded coconut, garlic and ginger. Sauté  very well. Put in the cumin and coriander powder, salt and turmeric, red chilli powder. Sauté very well .
At this stage put in the marinated mushrooms and stir continuously so that it mixes well with the spices. Put in the green peas if you are using it. Water is not required because the mushrooms will release water. Cover and cook till all water dries up. Put in the slitted green chillies one minute before switching off.
Garnish as you wish. Goes well both with steamed rice or roti.


Tuesday, 9 September 2014

CABBAGE KOFTA CURRY


Domesticated somewhere in Europe before 1000 BC, Cabbage is cooked in many ways...... steamed, stewed, sautéed , braised or even eaten raw. Different countries, different ways of eating it. Indians, or say our subcontinent cannot think of cooking anything without spices, we prepare cabbage  with spices and dollops of clarified butter. Doesn't it sound yum?

Actually, my men are not vegetable lovers in general! If I serve them vegetarian kofta, they would enjoy it, mostly with flat or puffed breads! I am particular about enough vegetables, just cannot think of a diet of meat & fish protein alone! A diet without vegetables is a wrong diet!

In our childhood, this vegetable was eaten only in winter. Nowadays, with its availability throughout the year, we really have to think about various ways of cooking it. It was a Sunday, a day with ample time to cook something different and with my vegetarian friends planning to unfriend me, I thought why not Cabbage Kofta today? Weekends should be the day for all kinds of time consuming  kofta curries & to be merry at the dining table.


INGREDIENTS : ( for kofta balls )

Cabbage : Shredded 300 gm
Boiled & Mashed Potato : 2 medium sized
Corn Flour : 2 tbsp
Turmeric powder : 1/4 tsp.
Green Chillies : 2 (thinly sliced)
Cumin Powder : 1 tsp
Coriander Powder : 1 tsp
Turmeric Powder : 1/2 tsp
Dry Mango Powder : 1 tsp
Salt : As per taste
Sugar : 1 tsp (optional)
Cumin Seed : 1/2 tsp
Oil : 2 tbsp

INGREDIENTS : (for the curry)

Onion Paste : 3 tbsp
Tomato Paste : 1 small tea cup
Ginger paste : 2 tsp
Garlic Paste : 2 tsp
Melon Seed Paste (charmogoz)
Cumin powder : 1 tsp
Coriander Powder : 1/2 tsp
Red Chilli powder : 2 tsp (adjust as per your requirement)
Turmeric powder : 1/2 tsp.
Green Cardamom : 3-4
Cinnamon Stick : 2-3 small sized
Clove : 3-4
Salt : As per your taste
Sugar : 1 tsp (optional)
Bay Leaf : 1
Everest Kitchen King Masala : 1 tbsp

Oil  : 2 tablespoon


PROCEDURE :

Wash and shred the cabbage thinly. In a microwave safe bowl put together the cabbage and water. Microwave at high for 4 minutes. When cold discard the water. This is done because raw cabbage may cause bloating in some. 

Heat the oil in a wok & temper with the cumin seeds!. Add the blanched cabbage & add the cumin+coriander+turmeric powders+salt and fold in well! Once the cabbage cooks well, add the dry mango powder, sugar & the potato mash, fold in well! Transfer to a bowl & wait to cool! 

Prepare the kofta balls & place on a greased oven proof metal plate! I had placed the small wired stool inside my convection mode microwave and placed the plate on it! I had cooked one side for 10 minutes at the microwave+grill mode & the other side for 6 minutes!

Mix together the pastes of the tomatoes, onions and ginger, garlic, melon seeds, turmeric & salt. Heat the oil, temper with the bay leaf and the cinnamon, cardamom & cloves. Add the spice paste. Fry until the raw smell goes and it turns golden brown. Now add the cumin+coriander+red chilli powders. Fry  for 2 minutes. Pour in 1 coffee mug of water. Cover and let the curry boil at medium heat.

Once the gravy turns thick, add the Kitchen King Masala & the sugar if you are using! Let boil for another minute & take down! Add the curry to the kofta balls only before 10-15 minutes of eating them!

      These are the tricks I have to use to force in some vegetables inside my strictly non-vegetarian son and  the husband. Hope you will enjoy too!!!


Sunday, 7 September 2014

MUTTON SAAGWALA


Mutton and Bengalis have a very strong bond. We love to have it, perhaps, every Sunday, if only our health permitted. Hence, we cook it with all our love whenever we get it. We prefer mutton rather than lamb because we love the fat that we get in the mutton. It adds to the taste of the curry. When it comes to cooking mutton, we are too generous about using oil and spices. When have the Bengalis claimed themselves to be health freaks when it comes to food? Taste and Flavour of food are too important to us. And you know, we need to break rules at times, otherwise life gets monotonous.

However, out mother is unlike the maximum of the Bengalis when it comes to the use of oil in cooking! She uses a lot less of oil in cooking, cooks in slow fire for a longer period, never hurries! Everything in the kitchen is in her control! Her level of patience is commendable! But she is not in the habit of praising others, this is not a good habit! I have taken majorly from her & her mother, the hobby of cooking; we hardly use cooker in cooking, it is used to boil few stuffs! In my home, I of get mutton often, but growing up in a middle class home; Hilsa & Mutton; the two loves were not too frequent in our home, may be so the love for them did not die!

The recipe today, Mutton Saagwala is actually a North Indian cuisine, may be a recipe by the Punjabi community that those in Pakistan too cook! I had it a couple of time at the Kolkata restaurants, which is quite popular in the menu list there. It is a dish where mutton is cooked with spinach paste besides other spices. It is aromatic and yummy, to go mainly with Indian / South Asian breads or of any type if you wish so. Let's proceed with it. My recipe may not be authentic!


INGREDIENTS :

Mutton : 500 gm
Plain Yogurt : 150 gm + 3tbsp [beaten]
Onion : 2 big
Ginger paste : 1 tsp
Garlic paste : 2 tsp
Green Chilli : 5 ( adjust as per your requirement )
Kashmiri Mirch powder : 1 tsp
Turmeric Powder : 1/4tsp
Salt : As per your taste.
Turmeric powder : 1/4 th tsp
Coriander powder : 1 tsp
Punjabi Garam Masala powder : 1/2 tsp
Spinach : 200 gm
Oil : 4 table spoon
Bay leaf : 1
Cumin seeds : 2 pinches
Juice of 1 lemon.

METHOD :

Wash the mutton. Marinate with the salt and turmeric. Beat 150gm of yogurt and pour onto the mutton. Mix well and refrigerate in a sealed container overnight.

Next morning take out the mutton. Slice the onions. Roughly chop the spinach discarding the roots. Wash thoroughly. Make a paste of the spinach along with the green chillies and 3tbsp yogurt in a blender. Garlic and ginger pastes should also be done.

Heat the oil in a wok. Temper with bay leaf and cumin seeds. Add the sliced onions. Fry till golden brown. Add the ginger-garlic paste. Fry well till the raw smell goes. Add salt, coriander powder, Kashmiri mirch powder. Keep stirring till the spices separate from the oil.

At this stage, add the marinated mutton to the spices along with the marinade. Mix very well. Lower the gas level and cover. Keep stirring every 5 minutes.

I prefer cooking mutton in wok instead of pressure cooking. Though it takes about 1 to 11/2 hr, it tastes great.

When the water dries almost , add the spinach- yogurt and chilli paste. Fold in well, cover again. Add salt if required. 

After ten minutes you will see oil separating from the gravy. Add the garam masala powder now. Stir well. Cover and cook for another 5 minutes. Add the juice of a lemon. Switch off the gas stove.

Your mutton saagwala / mutton with fresh spinach paste is ready to be served with pooris / parathas/ naan / steamed rice/ jeera rice. Enjoy your Sunday special lunch with some salads and pickle as sides.


Saturday, 6 September 2014

CORIANDER CHICKEN


CHICKEN I think is a staple these days. This was not the scenario , say about 30 years back. Chicken was not allowed inside the kitchen of many Indian homes. I remember , as a child, when I visited my maternal grandparent's home, chicken was cooked and eaten in earthen pots in the garden if my uncles and aunts wished to. Later the used pots were thrown away. Whatever the reason may be, for
us it was a picnic sort of thing. Perhaps because of this restriction, chicken tasted heavenly then.
In the present day scenario, Chicken is a rescuer, very handy, easily available and quick to make. It is absolutely necessary to prepare it in different ways. It is not difficult as you are spoilt with choices. Whichever way you cook it, it's a hit for my men. This flexibility of this bird really makes me happily cook it often happily.

Here's for you today Coriander Chicken; a very easy recipe with minimal spices. I have used only sliced onion, garlic paste, dry red chilli powder, green chilli-coriander paste in it!


INGREDIENTS :

Chicken : 500 gm [ I used Country Chicken]
Fresh Coriander leaves : 250 gm
Garlic Paste : 2 table spoon
Ginger Paste : 2 tsp
Plain Yogurt : 100 gm
Bay leaf : 1
Green Chilli paste : 2-3 tbsp
Onion : 2 medium
Garam Masala Powder ( Punjabi ) : 1/4 tsp
Salt : As per taste.
Oil : 3 tablespoon

PROCEDURE :

Wash the chicken ( boneless or with bones ) pieces very well, Pat dry. Beat well the yogurt and pour over the chicken. Add little salt. Mix well and refrigerate in a tightly closed container for 2 hours. Take out half an hour before cooking.

Cut and discard the end portion of the Coriander sprigs. Wash very well. Roughly chop and prepare a paste in the mixer. Keep covered in a tightly closed container , otherwise  the flavour goes.

Slice the onions thinly and wash. Heat oil in a wok. Temper with the bay leaf. Add in the sliced onions. Fry till golden brown.

Add the garlic & ginger pastes. Fry well till the raw smell goes. Add the green  chilli paste and little salt. Fry till the oil separate from the spice mix.

At this stage, add the chicken along with the marination. Stir and cover. Cook at low flame stirring occasionally.

When the chicken is half done , pour in the coriander paste. Stir well. Cover again . After 5-8 minutes  open and sprinkle the garam masala powder. Stir and cook for another 2 minutes.

Please note, no water is required for this recipe as it is cooked in the water that is released from the yogurt. It is a no turmeric recipe.

Enjoy with flat & puffed breads, even rice! You can see Broad Bean-Coconut Bharta & Water Cress-Potato-Raw Banana Light Curry on the side.


Thursday, 4 September 2014

CHOCOLATE CAKE WITH WHIPPED CREAM


DESSERTS......are taking over me I think......just as Eve was hooked towards the forbidden apple. I was just thinking whom to blame for this.....the exotic, wonderful, culinary experts I came across in life?This blame game is very interesting, we humans tend to blame every other person except ourselves. So no point wasting time on it. Rather cheers to all the wonderful cooks I pass by everyday.
Day before yesterday, I was just thinking what to do with the chocolates that are showered on me by my kids on their birthdays. Piled up on the refrigerator , my son thinks eating them would be a threat to his teenhood. So this idea propped up....why not a chocolate cake with molten Cadbury. I am not so good at garnishing and toppings n dressing but it tasted good they said. I swear it is not a bit of self promotion. Try it, very simple.

INGREDIENTS : ( for the Cake )
Refined Flour : 1 coffee cup
Baking Powder : 1 tsp
Baking Soda : 1/4 th tsp
Sugar : 1/2 coffee cup
Unsalted Butter : 1/2 cup
Eggs : 2
Milk : 2 table spoon
Cadbury Dairy Milk or any Dark Chocolate : Two 140 gm bars

INGREDIENTS : ( for the topping )
Whipping Cream : 1 cup
Freshly cut fruits of your choice.

Sieve the flour,baking powder and baking soda together and keep aside.
In a microwave safe bowl, put the chocolate breaking into small pieces. Add one tablespoon water. Microwave at lowest speed at intervals of 20 seconds till  it melts into a creamy texture. Stir at each interval.
Melt the butter. In the mixer , put the sugar and butter, blend at normal speed till sugar melts and the
mixture turns light and fluffy. Add the milk and the beaten eggs. Blend for another two minutes.
Now add the flour mix two tablespoon at a time and blend well each time.
Add the chocolate mix at this stage and blend well for 2 to 3 minutes. Your cake mix is ready.
Preheat the oven at 180 degree C. Grease a cake tin with oil and dust with flour. Pour the cake mix till  half of the tin size.
Bake at 180 degree C for 40 mins. Check by inserting a fork at the middle .If it comes out clean , your cake is done. Let it cool completely. Now transfer to a plate.
For the topping whip the cream till it forms soft peaks. Dress it well . Refrigerate.Top with freshly cut  fruits just before serving.
Note I have not used Cocoa powder for this recipe. So it was kinda melt in the mouth and chocolatty.


Tuesday, 2 September 2014

FISH BALLS IN RICH CREAMY SAUCE


This generation of kids wants everything on a platter. Wasting time on separating bones from the fish is a big no no for them. That they do not want to take pain doing anything, is offcourse our fault.  Generally speaking Parents these days are quite indulgent . I meant, there are many homes just as ours!

All said and done, end of the day Mommy dears want to see their kids happy. In doing so, they keep on experimenting with recipes . This mommy too does it  to see her son eating happily .

So this boneless fish balls in a creamy sauce is done for the family and is in offer to rescue the mommies whose kids are averse to deboning fish.


INGREDIENTS :

Boneless Fish Fillets : 300 gm [any boneless white fish will do]
Onion Paste : 2-3tbsp
Chopped Onion : 11/2tbsp
Chopped Green Chilli : 11/2tsp
Ginger Paste : 1/2 tsp
Garlic Paste :  1 tsp
Poppyseed : 1 tsp [alternatively use same amount of white sesame seed]
Cashew : 7-8
Raisins : 7-8
White Pepper Powder : 1tsp
Bay leaf : 1
Salt : As per taste
Thickened Cream : 2 table spoon
Bread Crumbs : 2-3tbsp
Corn Flour : 1tbsp
Oil: 5-6tbsp

 PROCEDURE :

Wash the fish fillets well and boil for 10 minutes adding a big cup of water and little salt. If doing it in the microwave; 5-6 minutes at high should be enough. Let it cool.

In a bowl, put the fish fillets. Add the corn flour , breadcrumbs, salt as required, chopped onion and green chilli. Mix all the ingredients very well. Shape into small round balls. Refrigerate for 1/2 an hour; more is better.

The poppy seed has to be soaked in warm water for 2 hours before making a paste. Make into a paste the poppy seeds, raisins and cashews together. If you use white sesame seeds, dry roast before you paste.

Heat oil in a wok. Fry the fish balls till light brown in batches. Place the fish balls in a serving bowl  and keep aside .

Temper the oil with a bay leaf, add the ginger and garlic paste. Fry till the raw smell goes. Now add the onion paste. Fry  for 2- 3 minutes .

Add the cashew, raisin and poppyseed paste. Fry at low flame so that the spices do not burn or turn brown. As the oil separates from the spice paste , add one cup water. Add salt and white pepper powder, let it boil till the gravy is just thick. Too much boiling may curdle the gravy. Add the thickened cream, stir and put off gas after one minute.

Pour the gravy over the fish balls. Garnish as you wish to. Serve  hot with any kind of flavoured rice.